Siekiant užtikrinti vartotojų saugumą, POP3/IMAP/SMTP prieiga per pašto programą nėra įjungta kaip numatytoji.
Taip pat, jeigu pageidaujate prisijungti prie pašto programos naudodami POP3/IMAP/SMTP protokolus, turite nustatyti kitą nei Jūsų el.pašto slaptažodį, kurį pamatysite iškart aktyvavę POP3/IMAP prieigą.
Jeigu norite aktyvuoti šį nustatymą:
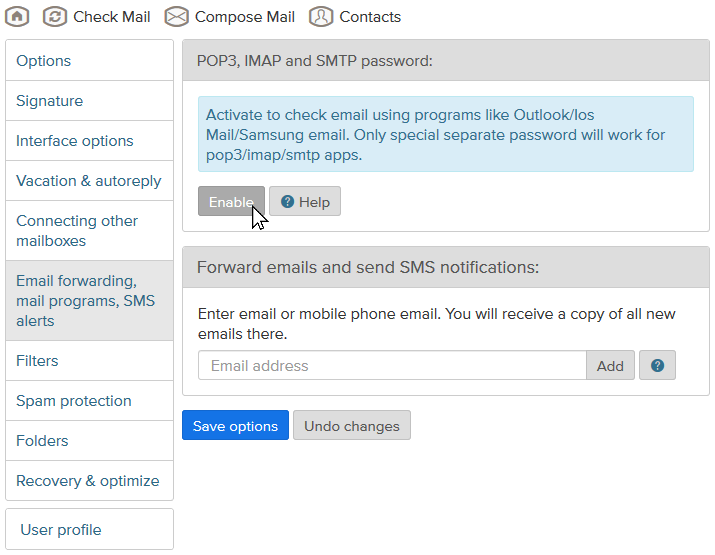
- Eikite į „Nustatymai“, pasirinkite „Pašto peradresavimas, pašto programos, SMS pranešimai“;
- Varnele pažymėkite „Suteikti išorinio POP3, IMAP ir SMTP prieigą“;
- Po aktyvacijos pamatysite naują slaptažodį naujame lange;
- Nukopijuokite šį slaptažodį ir naudokite jį pasirinktoje pašto programoje.
Prisiminkite! Automatiškai sugeneruotas slaptažodis nėra nuolatinis ir neskirtas dirbti pašto programoje. Jeigu išjungsite POP3\IMAP\SMTP pašto prieigą arba prieiga bus automatiškai blokuojama jei viršysite siunčiamų laiškų limitą arba bus pasikėsinta pavogti Jūsų paskyrą, tokiu atveju turėsite naudoti naują slaptažodį, kurį gausite iš naujo aktyvavę prieigą.
Dėmesio! Nustatymas „Suteikti išorinio POP3, IMAP ir SMTP prieigą“ gali būti automatiškai išjungtas šiais atvejais:
- Jeigu sąmoningai pažeidžiate apribojimą siųsti daugiau kaip 15 laiškų per valandą, jeigu naudojatės nemokama Inbox.lt pašto dėžute.
- Jūsų slaptažodis buvo pavogtas, o Jūsų paskyra pasinaudota spam laiškų siuntimui. Šiuo atveju Jūs nuolat gausite laiškus iš „Mail Delivery System“. Prieš aktyvuojant prieigą, privalėsite pasikeisti naudojamą slaptažodį.
- Jeigu naudotojo pašto dėžutė gaus statusą „neaktyvi“.
- Jeigu aktyvus naudotojas daugiau nei 2 mėnesius nesinaudos POP3 prieiga.
- Jeigu Jūsų pašto programoje bus nustatyti gedimai arba bus viršytas nesėkmingų prisijungimų skaičius.
Gali siųsti ir gauti laiškus ne tik į pašto dėžutę serveryje, o taip pat ir į pašto programas, tokias kaip:
- Microsoft Outlook,
- Microsoft Outlook Express,
- Windows Mail,
- The Bat!
- Mozilla Thunderbird,
- Apple Mail,
- ir kitas.
Jeigu naudojamas POP3 protokolas:
POP3 (incoming mail server): mail.mail.ee
- Būtina: SSL šifravimas aktyvuotas
- POP3 serverio portas: 995
SMTP (outgoing mail server) nustatymai: mail.mail.ee
- Būtina: TLS arba AUTO šifravimas
- SMTP serverio portas: 587 (jeigu naudojamas TLS šifravimas)
- SMTP serverio portas: 465 (jeigu naudojamas SSL šifravimas)
Jeigu naudojamas IMAP protokolas:
IMAP (incoming mail server): mail.mail.ee
- Būtina: SSL šifravimas aktyvuotas
- IMAP serverio portas: 993
SMTP (outgoing mail server) nustatymai: mail.mail.ee
- Būtina: TLS arba AUTO šifravimas
- SMTP serverio portas: 587 (jeigu naudojamas TLS šifravimas)
- SMTP serverio portas: 465 (jeigu naudojamas SSL šifravimas)
!!! Labai svarbu:
Norėdami įvesti slaptažodį savo el. pašto programoje (visiems laukams, pvz., Vardas/Naudotojo vardas), turite naudoti specialų slaptažodį, kurį galima gauti tik iš inbox.lv el. pašto nustatymų internetinėje sąsajoje - https://email.mail.ee/prefs?group=enable_pop3
Įsitikinkite, kad laukelyje „vartotojo vardas“ įrašėte pilną el.pašto adresą, pavyzdžiui, 12345@mail.ee
Pašto programos nustatymuose, reikia nustatyti autorizaciją išeinančio pašto serveriui SMTP.
Pašto programos nustatymuose varnele pažymėkite „Saugoti žinučių kopiją serveryje“ (EN. „Leave a copy of messages on the server”), kad laiškai taip pat būtų saugomi ir serveryje www.mail.ee. Pagal nutylėjimą ši parinktis yra išjungta, o tai reiškia, kad visi ar dalis laiškų Jūsų pašto dėžutėje išnyks (nebus pasiekiami www.mail.ee svetainės pašto dėžutėje).
Papildoma informacija:
Šiuos nustatymus galite naudoti, kai pašto programa nepalaiko SSL šifravimo.
Tokiu atveju pašto programoje privaloma aktyvuoti SMTP autorizaciją Inbox išeinančiam paštui. Daugiau informacijos apie tai rasite čia
Siekiant užtikrinti vartotojų saugumą, pagal nutylėjimą POP3/SMTP protokolas yra išjungtas. Norint aktyvuoti nustatymą, eikite į pašto dėžutės „Nustatymai“, spauskite „Pašto peradresavimas, pašto programos, SMS pranešimai“ ir pasirinkite „Aktyvuoti POP3 ir SMTP prieigas“. Išorinės POP3/SMTP prieigos bus aktyvuotos per 15 minučių. Daugiau
Naudodami POP3 pašto programoje Jūs turite galimybę atsisiųsti visą gaunamą paštą į savo įrenginį, taip pat išsaugoti gaunamas žinutes serveryje Inbox.lt svetainėje.
Apribojimai:
Nemokamos Inbox Mail pašto dėžutės vartotojams taikomi apribojimai siunčiamų laiškų kiekiui – naudodamiesi SMTP serveriu mail.inbox.lt per valandą galėsite išsiųsti daugiausiai 15 laiškų ir 5 laiškus per minutę (šie apribojimai netaikomi mokamos INBOX PREMIUM vartotojams).
Prisiminkite, kad paštas pašto programoje atnaujinamas ne dažniau kaip kas 5 minutes.
Dėl POP3 apribojimų, tikrinti tos pačios pašto dėžutės turinio negalima keliose įrenginiuose tuo pačiu metu.
Inbox.lt naudojimosi taisykles pažeidžiantiems vartotojams laiškų siuntimo paslauga bus sustabdyta.
Vartotojui įgijus statusą „neaktyvus“ – POP3 prieiga išjungiama.
Jeigu vartotojas nesinaudoja POP3 prieiga 2 mėnesius – POP3 prieiga išjungiama.
Pavyzdžiai:
IMAP nustatymai Thunderbird, Windows Live Mail, Microsoft Outlook pašto programoms
POP3 nustatymai Outlook vai Outlook Express
Nustatymai iOs device pašto programai
Attention! Before You configure any IMAP settings for Microsoft Outlook, go to www.mail.ee, log in with the account You’ll use for IMAP configuration and enable external POP3 and SMTP access. In order to ensure users’ safety, default access to mailbox using POP3/IMAP/SMTP protocol is denied.
When configuring IMAP settings in Microsoft Outlook, have to remember that placement of some settings can vary in depence on version of the program.
IMAP configuration in Microsoft Outlook 2010
- Start Microsoft Outlook,
- on the File menu, click Info and click Account Settings,
- select Account Settings from the list,
- on the E-mailtab, click New,
- select Email Account, and then click Next,
- click to select the Manually configure server settings or additional server types check box, and then click Next,
- click Internet E-Mail, and then click Next,
- in the Server Information section, select IMAP for Account Type,
- in the Your Name box, enter your name exactly as you want it to appear to recipients,
- in the E-mail Address box, type your e-mail address,
- in the User Name box, type your e-mail address,
- in the Password box, type your password,
- in the Incoming mail server box, type mail.ee,
- in the Outgoing mail server (SMTP) box, type mail.ee,
- for reason not to enter Your password any time programm loads incoming mail from Your mail.ee mailbox, tick the Remember password option,
- click on More Settingsand in a new opened window choose Outgoing Server tab,
- tick My outgoing server (SMTP) requires authentication and choose Use same settings as my incoming mail server,
- now open the Advanced tab and for the incoming server (IMAP) from the drop-down menu Use the following type of encrypted connection choose SSL, but for outgoing server (SMTP) from the drop-down menu Use the following type of encrypted connection choose TLS(recommended) or NONE,
- check that for Incoming server (IMAP)You have port 993, but for Outgoing server (SMTP)–587 or 25.
- click OK,
- in a window Add New Accountclick Next and wait till there is a form that shows You've succesfully finished operation.
- Now You have to configure folder list so it would be the same as in Your mailbox on mail.ee. For that reason:
- on the File menu, click Info and click Account Settings,
- select Account Settings from the list,
- click twice on the account You've just added,
- click More settings,
- in a new opened window Internet E-mail Settings choose tab Sent Items,
- choose Save sent items in the following folder on the server and in the list of folders select the folder where to save sent items, or create a new folder by clicking on New Folder,
- click OK,
- in a window Change accountclick Next,
- after these steps You will see a new window Test Account settings, and if all is done correctly, You'll see the green ticks near two options, - click Close,
- if there is a notification about successful account setup, You have finished configuration using IMAP, - click Finish.
You can root your mailbox in Outlook 2013 in the following way:
- File-> Account Settings-> Account Settings…
- Double click on your IMAP account.
- Button: More Options…
- Tab: Advanced
- Option: Root folder path
- Usually setting this to “Inbox” will do the trick.
- OK yourself out all of the opened dialogs.
To set up an e-mail account in a built in client programm in your mobile phone, you need such settings:
- Your e-mail adress - full e-mail adress, including "@" sign and domain name (for example, andrejs@mail.ee),
- Password - to work with the mail program via POP3\IMAP\SMTP protocols, you need to use another password for your email, which you will see immediately after activating POP3\IMAP access.
- User Name - for example, "andrejs",
Incoming mail server:
- POP3 server - mail.ee
- IMAP server - mail.ee
Outgoing mail server (SMTP server):
- mail.ee
Port:
- Port of POP3s server: 995 (using SSL encryption) More about POP3s
- Port of IMAPs server: 993 (using SSL encryption)
- Port of SMTPs server with TLS support: 587 or 25. More about TLS
*These ports are closed to use for security reasons: POP3 port 110. More
Also you need to allow POP3 access in your mailbox at www.mail.ee:
- Go to “Options”, click “Email forwarding, mail programs, SMS alerts”;
- Choose “Enable external POP3/IMAP and SMTP access”;
- After activating, you will see your password in the new window;
- Copy this password and use it for your e-mail in mail program.

How to set up e-mail on device with iOS operating system:
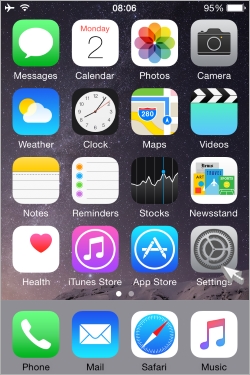
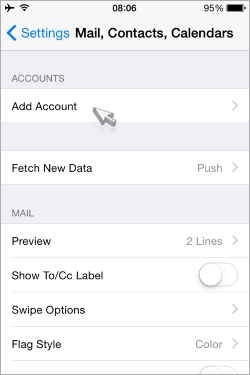
1. Enter phone Settings,
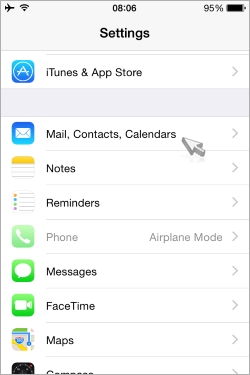
2. choose "Mail, Contacts, Calendars",
3. press "Аdd Account"
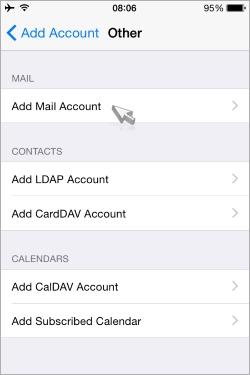
4. then "Add Mail Account"
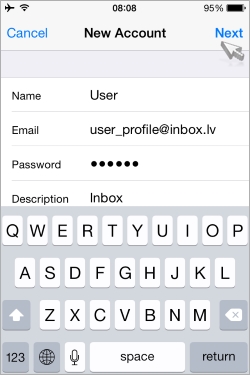
5. in a field "Name" enter your username, in "E-mail" - your complete e-mail address, "Password" - your password, then press "Next",
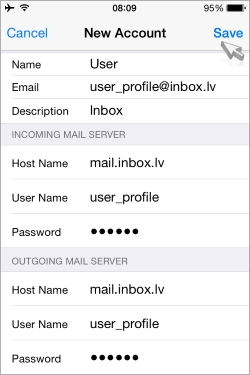
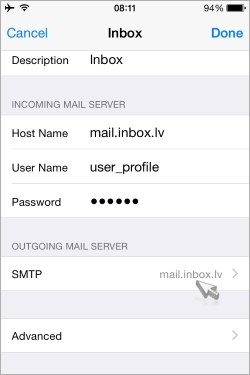
6. in a next window you have to fill in "Incoming Mail Server" and "Outgoing Mail Server" sections:
* in a "Host name" for incoming mail server you have to enter "mail.ee"(the same for POP3 and IMAP),
* in a "Host name" for outgoing mail server you have to enter "mail.ee" (the same for POP3 and IMAP).
Then it is obligate to press "Save", to see that account has been added.
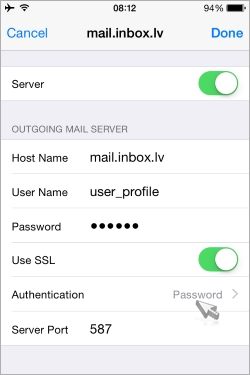
7. scroll down the screen till you see "Outgoing Mail Server" and press "SMTP"
8. near the option "Primary server (mail.ee)" tap "on"
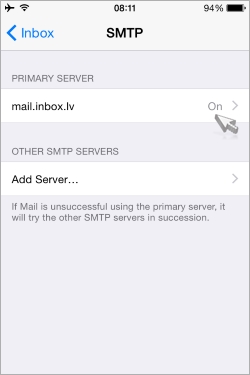
9. switch on "Use SSL" option and check that at the "Authentification" is chosen "Password".
